Chapter 1: Introduction
is_tested is a ecosystem of crates aimed at making your testing easier to follow and check certain quality.
The ecosystem is formed by these 3 crates:
cargo-is-tested: The binaryis_tested: The attributeis_not_tested: Another attribute (Optional)
We'll take a look at each one of these crates, explain the purpose, the usage, the installation, and everything related to them.
Starting with the binary and the most complex part of the project, cargo-is-tested. In the next page.
The Binary
cargo-is-tested is used to check your tests, ensure their quality, their abundance and their importance.
📦 Installation
Using crates.io
You can install the binary using:
$ cargo install cargo-is-tested
Manual installation
To install the tool, you're going to need the following.
Cloning the repo
Clone the github repository:
$ git clone https://github.com/blyxyas/cargo-is-tested
Install the project
$	cd cargo-is-tested;
		cargo install --path .
Now, ✨ It's ready to use! ✨
You can use at any point the following command to check that all your tests are there, with the dicted quality control.
$ cargo is-tested <my project path>
❓ Usage
Using the ecosystem is simple, but requires learning what to do.
You'll need to also know how to use is_tested (attribute), please, read that chapter before continuing.
Okay! I'll assume that you already know how to use the is_tested attribute, because you read the is_tested chapter.
The most innovative concept in this binary is the use of shebangs (#!). Yes, it turns out that Rust accepts shebangs as a valid token, even with not much functionality.
So, we can use a shebang at the start of a file to declare which lints we want (also possible with the CLI).
#! is-tested
You'll write this in the first line of a file to enable testing, the binary will parse this later, and will not cause an error.
Now, you can apply any lint you want, and each item will be subject to your linting.
To skip an item from linting, you can use the is_not_tested attribute. It has its own chapter.
#! is-tested functions

use is_tested::is_tested;
use is_not_tested::is_not_tested;

#[is_not_tested(reason = "It's the main function, duuuh")] // Reasons are optional!
fn main() {
	// [...]
}

#[is_tested("tests/a_function.rs")]
fn a_function() {
	// [...]
}

// No testing here, Oh no!
fn another_function() {
	// [...]
}
The code above will cause an error, a 🌌 pretty error 🌟, to be specific, because you specified (with that functions lint) that all functions must be tested.
There are lints for a lot of other items (check cargo is-tested --help), like structs, traits, macros...
In-test lints
Some lints are applied to ensure that an item type is tested, others are applied to ensure that your tests have an amount of quality control.
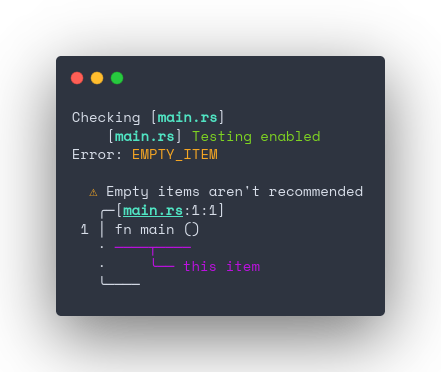
For example, the lint emptiness will check that your tests don't contain empty functions.
Error reporting
Using miette's error reporting capabilities, we can send beautiful errors, so that you know in exactly which parts of your file you must resign as a programmer.
For example, if you create a function main that is empty, it will give you a warning, a beautiful one.
The Attribute
The is_tested attribute is used to mark an item with a test, it's an essential part of the ecosystem, even without changing the item.
📦 Installation
You can install the attribute by writing this in your Cargo.toml file:
[dependencies]
is_tested = "0.1.1"
This will unleash the power of is_tested in your hands.
❓ Usage
You can use this attribute as any other attribute is used, with #[is_tested], this attribute takes one argument, a string serving as path, this path is the path (from project's root) of the tests for that item.
As an example:
use is_tested::is_tested;

#[is_tested("tests/my_func_tests.rs")]
fn my_func() {
	// [...]
}
You can use the attribute in any testable item, like structs, functions, macros...
Some items aren't included in the ecosystem because testing them isn't useful (like use statements).
Now continue reading the main chapter, The Binary.
The (Other) Attribute
is_not_tested is an optional crate, and the opposite attribute to is_tested. It can take a reason (optional), and it marks that the item won't be tested, and that's intentional.
It is comparable to #[rustfmt::skip].
📦 Installation
Write this in your Cargo.toml file to install is_not_tested:
[dependencies]
is_not_tested = "0.1.0"
Now, ✨ It's ready to use ✨
❓ Usage
Pick the item that you don't want to test, import the is_not_tested attribute, and then use it. It can take a reason, or not.
#! is-tested strict

use is_not_tested::is_not_tested;

#[is_not_tested(reason = "Too simple to have useful tests.")]
struct MyStruct(String);
Now continue reading the main chapter, The Binary.
The Lint List
The project cannot provide an updated list of all lints implemented, you can check all the lints that exist in the official documentation (updated along the source code.)
There's nothing here... I swear
Capítulo 1: Introducción
is_tested en un ecosistema de crates enfocado en hacer tus tests más fáciles de seguir, y asegurar cierta calidad.
El ecosystema está formado por estas 3 crates:
cargo-is-tested: El ejecutableis_tested: El atributois_not_tested: El otro atributo (Opcional)
Vamos a echarle un vistazo a cada una de estas crates, explicar su propósito, cómo usarlas, la instalación y todo lo relacionado a ellas.
Empezando con el ejecutable y la parte más compleja del proyecto, cargo-is-tested. En la siguiente página.
El Ejecutable
cargo-is-tested es usado para probar tus tests, garantizar su calidad, abundancia e importancia.
📦 Instalación
Usando crates.io
Puedes instalar el ejecutable usando:
$ cargo install cargo-is-tested
Instalación manual
Para instalar la herramienta, necesitarás lo siguiente.
Clonando el repositorio
Clona el repositorio de Github:
$ git clone https://github.com/blyxyas/cargo-is-tested
Instala el proyecto
$	cd cargo-is-tested;
		cargo install --path .
Ahora, ✨ ¡Está listo para usar! ✨
Ahora puedes usar en cualquier momento el siguiente comando, para comprobar que todos tus tests estén ahí, con la calidad dictada.
$ cargo is-tested <camino al proyecto>
❓ Uso
Usar el ecosistema es muy fácil, pero requiere saber qué hacer.
También necesitarás saber como usar is_tested (atributo), por favor, lee ese capítulo antes de continuar.
¡Ok! Asumiré que ya sabes como usar el atributo is_tested.
El concepto más innovador en el ecosistema es el uso de shebangs (#!). Sí, resulta que Rust acepta shebangs como un token válido, incluso sin tener mucha funcionalidad.
Así que, tenemos que usar un shebang al principio de un archivo para declarar que lints queremos (también posible con la CLI).
#! is-tested
Tienes que escribir esto en la primera linea de un archivo para activar los tests, el ejecutable va a parsear esto después, y no causará un error.
Ahora, puedes aplicar cualquier lint que quieras, y cada item será sujeto a tus lints. Para omitir un item, puedes usar el atributo is_not_tested. Tiene su propio capítulo
#! is-tested functions

use is_tested::is_tested;
use is_not_tested::is_not_tested;

#[is_not_tested(reason = "Es la función principal, duuuh")] // Reasons son opcionales!
fn main() {
    // [...]
}

#[is_tested("tests/a_function.rs")]
fn a_function() {
    // [...]
}

// Aquí no hay tests, Oh no!
fn another_function() {
    // [...]
}
The código superior causará un error, un 🌌 error bonito 🌟, porque has especificado (con el lint functions) que todas las funciones deben estár comprobadas.
Hay lints para muchos items (Comprueba cargo is-tested --help), como structs, traits, macros...
Lints en los tests
Algunos lints son aplicados para asegurar que un tipo de item tiene tests, mientras que otros son aplicados para garantizar que tus tests tienen cierta calidad.
Por ejemplo, el lint emptiness se asegurará que tus tests no contienen funciones vacías
Reporte de errores
Usando las capacidades de reporte de errores de miette, podemos mandar errores preciosos, para que puedas saber exáctamente que parte de tu archivo te va hacer replantearte tus habilidades.
Por ejemplo, si creas una función main que esté vacía, te dará un aviso, pero uno muy bonito.
El Atributo
El atributo is_tested es usado para marcar un item con un test, es una parte esencial del ecosistema, incluso sin cambiar el item.
📦 Instalación
Puedes instalar el atributo escribiendo estó en tu archivo Cargo.toml:
[dependencies]
is_tested = "0.1.1"
Esto desatará el poder de is_tested en tus manos.
❓ Uso
Puedes usar este atributo como cualquier otro, con #[is_tested]. El atributo toma un argumento, una string que sirve como dirección al archivo en donde están los tests (desde la raíz del proyecto) de ese ítem.
Por ejemplo:
use is_tested::is_tested;

#[is_tested("tests/my_func_tests.rs")]
fn my_func() {
    // [...]
}
Puedes usar este atributo en cualquier item testeable, como structs, funciones, macros... Algunos items no están incluidos en el ecosistema porque testearlos no es útil (como use)
Ahora continúa leyendo el capítulo principal, El Ejecutable.
El (Otro) Atributo
is_not_tested es una crate opcional, y el atributo opuesto a is_tested. Pueden tomar una razón (opcional), y marca que el item no será testeado intencionalmente.
Es comparable a #[rustfmt::skip]
📦 Instalación
Escribe esto en tu archivo Cargo.toml para instalar is_not_tested:
[dependencies]
is_not_tested = "0.1.0"
Ahora, ✨ ¡Está listo para usar! ✨
❓ Uso
Elige el item que no quieres testear, importa el atributo is_not_tested, y luego puedes usarlo. Puede tomar un argumento (reason, la razón de porqué no hay tests), pero es opcional.
#! is-tested strict

use is_not_tested::is_not_tested;

#[is_not_tested(reason = "Too simple to have useful tests.")]
struct MyStruct(String);
La Lista de Lints
El proyecto no puede proporcionar una lista actualizada de todos los lints implementados, pero puedes comprobar todos los lints que existen en la documentación oficial (Actualizada junto al código fuente).
Aquí no hay nada... Lo juro